Saturday, February 23, 2013

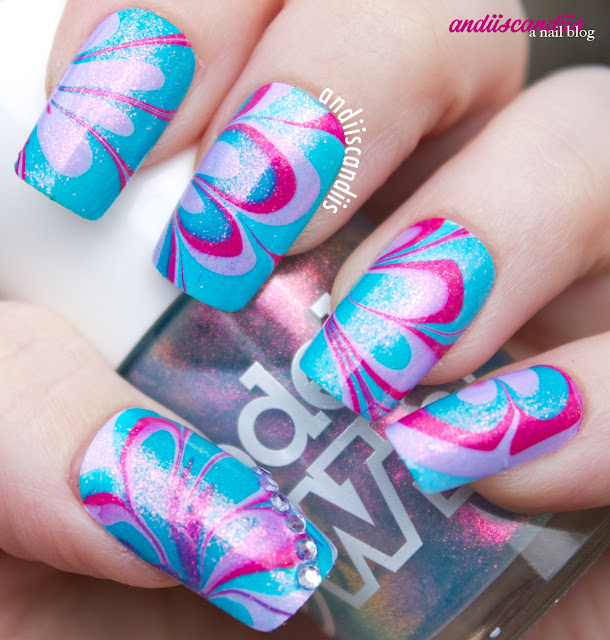
Water Marble!

My own nails are far too short right now to pull off a proper water marble, and since I can't do traditional acrylic extensions right now with my pregnancy, I decided to make a set of falsies to wear.

I do this from time to time and I can actually get some decent wear time out of them if I'm careful. :)

These are quite a bit longer than I'm used to, but I'll see how long I can handle them before I need to file them down. So far so good!


I started with a white base on the nails. For this, I used China Glaze White on White. Just one coat, which I let dry most of the way. For the marble, I alternated Rimmel Posh Pink, OPI Rumple's Wiggin & Butter London Slapper. Slapper wanted to spread out a lot, so I had to be careful with it. First few tries weren't great (I have those on my right hand, lol) but they weren't bad. Once I mastered the swirl, oh man...

I'm officially in love with doing water marble now. *__* I finished these off with a coat of Model's Own Indian Ocean (pictured) which really made them pop. I love this polish so very much. 

One of the biggest tips I can give those who want to do water marble is this: use hot/warm water and clean the water once every few nails with clear polish. I also dumped my water after five nails and started over. Living in Florida and not having a water softener, I have fairly mineral water so I also had to wait for it to settle just a bit before I began (the few little spots are from trying to early). 

I plan on doing a set of water marble with art for St. Paddy's Day, so stay tuned for that! I'm also going to start selling these on my Etsy when I get the supplies I need. :)

Thursday, February 14, 2013

NOTD: Valentine's Grunge

Valentine's Grunge Nails - I apologize for the poor lighting, we're having a very dreary day. :(
Both the hubby and I have to work today (and he's currently getting his ass handed to him, poor thing - stop calling 911 on Valentine's Day, people! ):) so my Valentine's Day will be fairly lackluster, I'm sure. Oh well, I decided to paint my nails for it anyway.

I started with a base of China Glaze White on White, two coats, followed by sponging on dark pink and red acrylic paint. Once the paints were dry, I took a wet make up sponge, dabbed it on the nails and then used the dry side to 'erase' bits off. My white acrylic paint bit the dust the other day (don't switch your white and black lids people...it ends in disaster) and I've yet to find time to replace it. I had to use my nail art pens which...meh, they did what they needed to. I didn't want it to be perfect, so I suppose that was probably better. After the hearts had dried some (but not all the way), I took a makeup sponge again and dabbed just a little bit of the pink over the art. This picked up some of the black and speckled it as well.

I will definitely be using the 'eraser' technique in future manis. It only works with the acrylic paint, since it's water soluble, but it does give a really cool effect. :3

Happy Valentine's Day, everyone!

Tuesday, February 12, 2013

NOTD: Mystery Polka

Julep Mystery Color topped with OPI Polka.com
Well, my Gelish gels didn't last. :( They're a little TOO easily soaked off and just one day of work had them popping off. :/ So back to little nails I go!

It's also probably better now that I've gotten a position at a local medical training institute as a student services coordinator. Typing + long nails = disaster. I'm going to part-time at the salon, though, so I'll still be there. :)

This mani is done with the blue Julep mystery color I picked up in the Secret Store a few weeks ago. It's a very pretty blue/teal frost. I really wish it had a name, lol. I also picked up OPI Polka.com last week and wanted to try it out so very badly. So, voila, this mani! Very festive for the state fair tomorrow, don't you think?

Friday, February 8, 2013

NOTD: Valentine's Day Part 1

Ended up without a babysitter so work had to be cancelled for today, but I stopped by to give my boss her birthday card and pick up some of my art supplies to do my art on the manicure I posted earlier!

I wanted to do something a little special because when I post to tumblr, it will be my 100th post on that blog.

Unfortunately, my white pen decided to give me a bit of shit, so I'm not 100% happy with the thumb, but I can deal for now. I also lost the awesome sun I had this morning as a cold front is moving in, so bleh. Pictures turned out fairly well, though.

Used a stamp for the lips because, really, how awesome is that stamp?!!!
This is just the first set of nail art that I have planned for Valentine's Day. Since my husband has to work day of, we're going to celebrate with a family trip to the State Fair on Wednesday and I want to do something EPIC. I've got a batch of water decals coming my way that I hope are here for that. *___*

PS: I did a bit of tweaking to the layout here and have a new one up. I am also now on twitter! Follow me? I'll be posting little tidbits and such and lots of pictures of nail finds! :)

Valentine's Preparedness: Julep Base Mani

Quick PSA: You can now follow my blog with Bloglovin.

My salon has made the decision to eliminate acrylic nails from our menu in an effort to move toward becoming a 'greener' salon. We're also in a fairly small space and the ventilation just really wasn't there. While it makes me a bit sad that I have a lot of acrylic products I love, I'm also happy seeing as my second pregnancy is giving me a bit of trouble and I'd like to avoid the fumes if all possible.

That being said, we're contemplating adding gel enhancements to our menu. Our other cosmetologist that does nails is not familiar with gels, and the product is all mine so I'm not sure how it would work, but I threw on a set of Gelish Soak-Off Gel Enhancements on over tips yesterday to see how well they wear. I still need to get my hands on Pro Bond, but my local CosmoProf has yet to carry it. I'm sure as hell not waiting until Premier Orlando in June to get it, so I'll more than likely have to order it online soon. I used an IBD gel primer for these and it seems to be holding up well enough. Not something I want to use for clients, though. (I got distracted while writing this and ended up ordering ProBond through the ONLY place I could find it. Gelish, why for you make your enhancement products so hard to purchase even for pros???!!!)

ANYWAY...distraction. Where was I? Oh yes. Remember how I said I was going to use Molly & Carrie in nail art soon? Well, it's not nail art...yet (have to be at work for that, and I don't go in til later), but I've got the base down....with some added bling. :3

Carrie on most, Molly on Ring & Thumb (not pictured). Right hand is opposite.
AND THE BLING - Oscar under the tips.
I wanted some form of glitter in with this mani, but I didn't want to ruin the nice soft look of the cream on the main nail. I've never done peak-a-boo tips, but Oscar seemed like the perfect option for it! That is two coats and I may still end up with another in the end, I'm not sure.

An update will come later when I do the design on them I have in mind at work. I'll cross-post to tumblr at that time as well, as it'll be my 100th post and I want it to be ~special~.

Thursday, February 7, 2013

Julep Cupid Mystery Box!

First time posting from my phone, so bear with any mistakes!! :)

I got my Julep Cupid Mystery Box today, and luckily the mail man came before I left for work! I ended up with 5 polishes and a lip gloss! Possibly my best mystery box haul yet!
5 polishes and a lip gloss! Woo!
Colors are, from left to right: Molly, Carrie, Lynn, Maria, and Evangeline.


Molly is a gorgeous cream red. Application and coverage were super quick and it had a good mix of blue and orange tones, keeping it right in the middle of the reds.

Carrie is absolutely a bubblegum pink cream. It's an older release, before they changed to the wider brush. Still, went on well and finished gorgeous.

Lynn isn't something I'll see myself wearing often, but it is really pretty and will be good for my clients. I'm actually thinking it might be something nice to buy my mom for Mother's Day as well, as that's one of her usual color families. It's a slight shimmer with fairly opaque coverage (first coat was a bit sheer, second covered).

Maria. OHHHH Maria. A super pretty purple/pink metallic. Pretty easy to get linear without much trouble, but cap your free edge first, as with most metallics/frosts!

Evangeline is a polish that is not listed on Julep's site and the bottom says it's the 33rd polish for 2013 (if I'm reading it right). The box was advertised as having either a coupon for a free color of your choice (which I did not get), or a mystery holographic. If Evangeline is the mystery holographic well...I am disappoint. :( After the awesome that is Rebel, Evangeline had absolutely NO holographic effect to it. I didn't get to look at it in sunlight as it was cloudy today, but even under my desk lamp I couldn't get anything. Rebel BLINGED under my desk lamp. I got a reply from Julep CS today and Evangeline is NOT a holographic. The advert was apparently wrong and you could either get Rebel, Ginger, a gift cert for a polish OR an unreleased mystery color, which was Evangeline. I appreciate their pretty prompt reply but I'm a little :/ about the misinformation in the advertisement. I think they're still trying to pass this off as a holographic but I'm not 100%. The polish and swatch are at work so I'll check it out when I get in today.

Overall, I'm happy with this mystery box. One of the better ones they've put out. I've got an email in to CS to inquire about the 'holographic' so we'll see what they say. I didn't get any dupes (except for the lip gloss which I'd lost anyway so SCORE), and all of the colors are great for me.

Expect a post of nail art with Molly and Carrie up soon. ;)

PS: Remember, if you're not a Julep Maven yet and would like to try it, go here to sign up! You can get your first box free if you use the code FREEBOX! Can't beat that!


Sunday, February 3, 2013

NOTD: Pink Oscar

Julep Oscar accent nail with Revlon Pink Lingerie
I picked up Oscar as an add-on to my February box and I've been dying to try it out. I'm a sucker for glitters, but I didn't want to do an entire glitter mani. Everyone is doing some sort of Super Bowl theme today but seeing as I couldn't care less about either team, I went for this instead. XD Sadly my Freedom Top Coat is at work and I had to use China Glaze Fast Forward (still an awesome topcoat) but I've already smudged my middle finger. :/ Oh well.

Wednesday, January 30, 2013

Julep: February Maven - Rebel, Joan & Freedom Top Coat Review

Let me just preface this with...I'M SORRY. It's been a while since I've posted here, really just because I've been busy. Being a professional nail technician is quite a bit different than nail art as a hobby. Usually, I don't get time for my own nails or a chance to really experiment. 99% of my clients either want shellac, very basic nail art, or pink & white acrylics. Not much room for play there, huh?

What does that mean for this blog, you ask? Not much, really. Actually, I take that back. It means I'll probably be able to post more. I'll want to play more, to focus on my own nails and actually have time to review things! Shock!

With that, I bring you to today's post. Julep! I've been a Maven for a while now, and I adore it. I've never skipped a box, bought several mystery boxes and even done a few side orders for things I really want. As a Maven, not only do you receive a box in the mail every month with fantastic products for only $20, but you get discounts around the site and special perks like sneak peaks of new products. It really is something I adore having. :)

Out of the entire time I've been a Maven, I've never been more excited for a box as I was February. So excited, even, that I switched up from my normal "Classic with a Twist" box to "It Girl" to get Rebel. You see, not only is Rebel named after the awesome Rebel Wilson of Bridesmaids and Pitch Perfect! fame, it's a silver holographic. *insert drooling here* I've always been a huge fan of holographic nail polishes. Nfu Oh 61 was such a gorgeous polish to me, and I own it and still love it. But it's an utter pain in the ass, even with the proper base coat. Let's not forget that top coat absolutely ruins the effect and so your wear is barely even a day...if that. Rebel though....oh Rebel.

Let me begin with application. Rebel goes on super smooth with NO DRAG. The biggest problem I had with 61 was the drag. You HAD to go thin to get an even layer and god forbid you touch it again with that brush until it was completely dry. Even then, drag happened and there were three coats before you got a perfect holographic finish. With Rebel, I had full coverage in ONE. COAT. ONE. OOOONNEEE. How many times do I have to repeat this? I was absolutely in love from the get-go. Now, I'd pulled a stupid and done Shellac on my nails today (Black Pool & Wildfire) forgetting that my Maven box would be in the mail when I got home. EVEN over Black Pool I had complete coverage in one coat. I did two on my fingers and toes, simply for wear.

Rebel reverse french/border over Black Pool, Joan over Wildfire

Picture in full sunlight of Rebel with the Freedom Top Coat. Adjusted just enough to get the same effect as RL. :)


I don't think ANY image, DSLR or not will ever really capture how amazing holographic polishes look when done right. This is taken in normal house lighting with only minor exposure adjustments. Had there been sun left today, I would have taken a picture outdoors. I'll probably add that tomorrow. Daylight photo added!!!! Even so, the holographic effect IS visible...WITH TOP COAT. 

Rebel Verdict? A+

Now, on to the other product I was drooling over for this box: Freedom Top Coat. If you're not familiar with it, Freedom is a polymer-based top coat. This means instead of being evaporation-set like most typical polishes, it is light cured. This is similar to the technology behind gel polishes, with the main distinction being that ANY light will cure this top coat. Packaged in a black bottle to prevent curing, Freedom goes on smooth and quick and is set within 3-5 minutes in normal light depending on proximity to the light source. Mine was set within 3, I think. You can cure it quicker by placing your nails close to a normal 60watt bulb to maximize the cure time to 60 seconds. This could be as simple as placing your hand under a desk lamp for a minute to have perfectly dry nails!

The ONLY downside I see to this top coat is the fact that the polish underneath DOES have to be dry. Normal polish can take up to 24hrs to completely set, but is usually dry to the touch within five. I usually have a completely set manicure (provided I don't do something stupid, like dishes) in about an hour with a fast-dry top coat. I have a feeling if you put this on too-wet polish, you're going to dent and slide and your polish underneath will never properly set. At least, I know that's what happens if you attempt to use a UV-cured top coat over regular polish that is not 24hr set. I have a feeling Freedom breathes a lot better, though, so you probably want dry to the touch when you apply it.

Since I used it over two coats of Rebel and only one of Joan, I was able to apply it after about five minutes. Holographic polishes set quick, so even on my toes it was a matter of minutes before I could apply it and then it was set. *__*

I've had several clients ask me if there is any way to do a gel-like top coat over their regular polish and until now I've had to turn them down. The Freedom Top Coat is a great tool for any tech and definitely a fantastic at-home product. :) Now I just wish it came in professional size ;)

Freedom Top Coat Verdict: A+++

If you're interested in Julep Maven and haven't signed up yet, go here and type in the code "FREEBOX"to get your first month free!